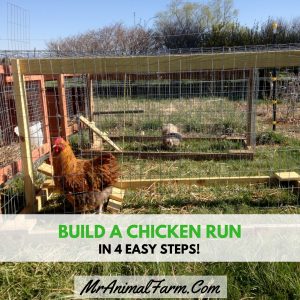
If you have chickens, they will likely need a chicken run. Because pre-made chicken runs can be expensive we decided learn how to build a chicken run ourselves.
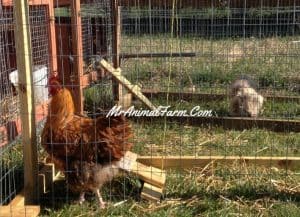
This portable chicken run is light and easily moveable. Therefore, it is perfect for keeping chickens on new ground and grass.
We use this type of portable chicken run for our breeder pens. You can also make a predator proof permanent chicken run.
When starting to learn how to build a chicken run, it is really important to know what qualities you are looking for in your chicken run. These chicken run plans below are for a lightweight, easy to move, portable chicken run.
Ready to learn how to build a chicken run?
First, what will you need when building a chicken run?
Supplies for your chicken run plans:
3 - 6' 2x4's (for lighter weight use 1x4's)
4 - 3' 2x4's (for lighter weight use 1x4's)
1 - 2x12x6 Plank
1 - 1x1x8 board (cut into 8 1' strips)
25' Welded Wire fencing (or 1x2 Welded Wire)
Fencing staples
2 ½" Torx screws (1 ⅝" if using 1x4 boards)
Drill
Hammer
Wire Cutters
Optional:
1 - 6x6 Corner squares (approximately 1" thick)
The Chicken Run Plans:
1.) Build the Base of your DIY chicken run
- Line one 3' 2x4 with the end of one 6' 2x4 creating an L shape.
- Screw the 3' piece into the end of the 6' piece.
- Repeat this with the other 3' & 6' pieces.
- Line both L shapes together to make a rectangle and screw them together.
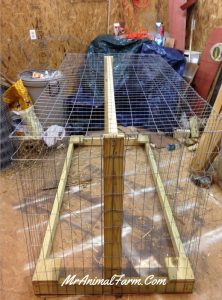
2.) Build the Supports
This is an essential step when learning how to build a chicken run as it will be the structure for your run. It is important that it be solid and sturdy.
- Place a 3' 2x4 vertically in the center of the 3' end of the base. This should make the shape of an upside-down T.
- Secure this board in place.
- Repeat the previous step on the opposite side.
- Secure the final 6' board between the two vertical 3' boards. (See image 1 below)
- Optional: Add a 4x4 square board to each corner. This will provide a little more support to the corners and give your chickens something to climb on.
3.) Build the Walls and Top
- Using your wire cutters, clip a section of welded wire that is 18' 9" long and 3' 5" wide.
- Starting at a 3' vertical post, secure one end of the welded wire to the center of the post with fencing staples and begin to wrap the welded wire around the entire run. Periodically, secure the wire to the base to keep the walls tight.
- Finally, add a top by cutting a section of welded wire that is 6'5" long and 3'5" wide. When cutting this section leave the outside edges open. This will allow you to wrap the remaining prongs from the welded wire top around the squares of the walls. See the picture as an example
4.) Build a Door & Ramp
- Measure the height and width of your existing coop (or hutch) hatch or door.
- Cut a hole out of the welded wire at the correct height to line up with your coop door/hatch. Use some of the extra welded wire to make a door that is slightly larger than the hole you just cut. You can use the prongs of the wire as hinges like you did for the top.
- Take your plank and attach a 1' 1x1 strip at the top. Continue to attach each strip until you have 7 rungs and you have reached the bottom.
- Use your final rung on the reverse side of the top of the plank. This will hook over the opening of your door and keep it in place.
- The length of the board will vary depending on the height of your door. I recommend trying to keep the board at a 30 degree angle.
Improvement ideas to think about when building a chicken run
If you are wondering if figuring out how to build a chicken run is worth it, the answer is yes!
This is a pretty quick project. Really, the most time consuming part is cutting the welded wire and attaching it to the top. And it is a really big money saver over buying a pre-built one from the store.
I made ours using 2x4's and 2x4 welded wire. If I were to make another one, I would switch to 1x4's and 1x2 welded wire. Because the 1x4's make a huge difference in weight it makes the run easier to move.
Due to the fact that the 1x2 welded wire is smaller, it makes it more difficult for predators to get in and baby chicks (or smaller birds) to get out. Also, you can add a PVC pipe to one of the vertical posts as a roost for your chickens.
Looking for other building projects? You might like: Building a chick brooder.
So, what type of run do your chickens have?
For more on Chickens:
[pt_view id="3d0b212jvx"]