So, you already know how to incubate chicken eggs and help chicks hatch if they have any trouble. You know how to raise baby chicks and even made them a DIY Chicken feeder. But, a chicken math sets in you may find you have a need for a larger brooder. We have some easy chicken brooder plans that we use to build ours.
If you have more than just a few little chicks to brood, or if they are getting older, but not quite ready for the coop (and you want them out of the house) then these chick brooder plans are for you!
Chick Brooder Box Ideas
You can, of course, use things like a rubbermaid tote if you have a small amount of chicks. Totes like this will work for just a few chicks until they are a few weeks of age.
You can also use a feed trough for your chicks. While this will hold a few more chicks a little longer than a plastic tote does, it is not very versatile overall.
And, you can come up with a whole slew of other homemade chick brooder designs like turning old dressers, tv stands and other furniture pieces into cozy brooder boxes for your chicks.
However, if you want an easy to move, lightweight brooder. One that is easy to clean and you can customize the size. Then, you might want think about building your own. And, quite frankly, often times this can end up being a sturdier and cheaper option. And any option that makes taking care of chicks easier is helpful.
When Will You Need A Larger Chicken Brooder Box?
When we started out raising chickens we would only have a few (like 10 or so) chicks at a time. So, having pretty small chicken brooders inside the house was super easy to handle.
However, then we started raising pullets to sell. We would only get about 25 or so at a time, but that was too many to have in a small rubbermaid tote which was our original brooder box. So, we built two smaller chicken brooders from 2x4's and chicken wire in our basement.
As chicken math often times will do, those 25 chicks at a time started to increase a lot when we started breeding our own chicks regularly. We introduced about 8 different chicken breeding coops (we build these chicken runs for our breeders and they have worked GREAT!).
So, when we started getting into hatching our own chicks regularly and we would have single hatches of 25 chicks or more.
We quickly realized that the smaller brooders in the basement just wasn't going to cut it anymore.
We were lucky enough to already have a metal storage shed (complete with electricity) already on our property. We were not currently using it. So, we started designing a larger chicken brooder to fit into our shed.
I have to tell you, it was a BIG relief to get the dusty chicks out of the house and into a shed outside. These large DIY chicken brooders work super great! We have four of them that fit snugly into our metal shed.
You could certainly put these chicken brooders in your basement if you have a large one, or in a barn area as well. We chose a metal shed because there is not hay and whatnot to blow around and create more of a fire hazard.
We have an easy guide to build a nice and sturdy chicken brooder perfect for your feathered (or almost feathered) friends.
Need some help keeping your chickens health and care taken care of? Check out the Organized Chicken Keeper for an easy to follow system.
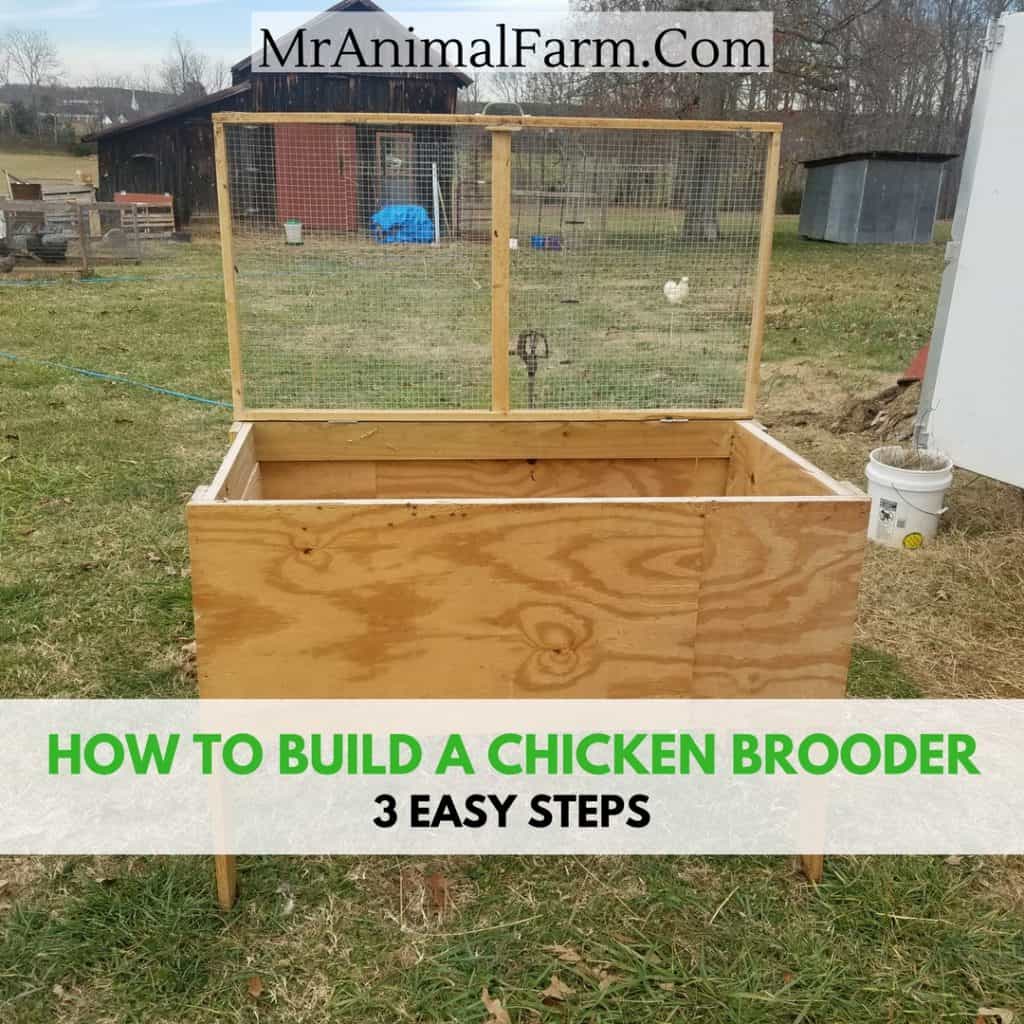
Homemade DIY Chicken Brooder Plans:
Before starting you will want to measure the area in which you want to put the chicken brooder. You are, of course, free to make any modifications you like so that it will fit comfortably wherever you choose to put it.
This set of plans will make a brooder that is 3' tall (1' off the ground + 2' brooder height), 2' in depth, and 3' wide.
We have actually used these plans to make 2 brooders this size and then we modified them slightly to make 2 additional more square brooders.
This sized poultry brooder can very comfortably fit 30 - 50 chicks as day olds. Of course, as they start to get older and bigger, they will need more room.
Supplies:
4 – 3' 1×4’s (width)
4 – 3' 1×4’s (height)
4 – 2' 1×4’s (depth)
2 – 3' 1×2’s for lid (width)
2 – 2' 2" 1×2’s for lid (depth)
2 – 2×3 sheets of plywood or 0.375-in treated/untreated wood siding panel(front/back walls)
2 – 2×2 sheets of plywood or 0.375-in treated/untreated wood siding panel (side walls)
3 - 2' 2" 1x2's (support for bottom and lid)
1 Pack of 2 cabinet hinges
1 drawer handle
1? Torx screws
2 - 2' 2"x3' sheets of Galvanized Steel Hardware Cloth
1 ½" fencing staples
Drill or Screwdriver
Pencil
Level
Zip Ties
Wire Cutters
Rubber Mallet (optional)
1.) Build your Frame
First, measure 12" up on each of the 3' 1x4's (height) and make a mark with a pencil. This 12" section is the lower part of the brooder leg.
Line the end of one 2' 1×4 (depth) perpendicularly with the mark you just made on the 3' 1x4 (height) so they are flush. Screw these together.
Repeat this with another 3' 1x4 (height). You should have 3 pieces connected to form an 'H'.
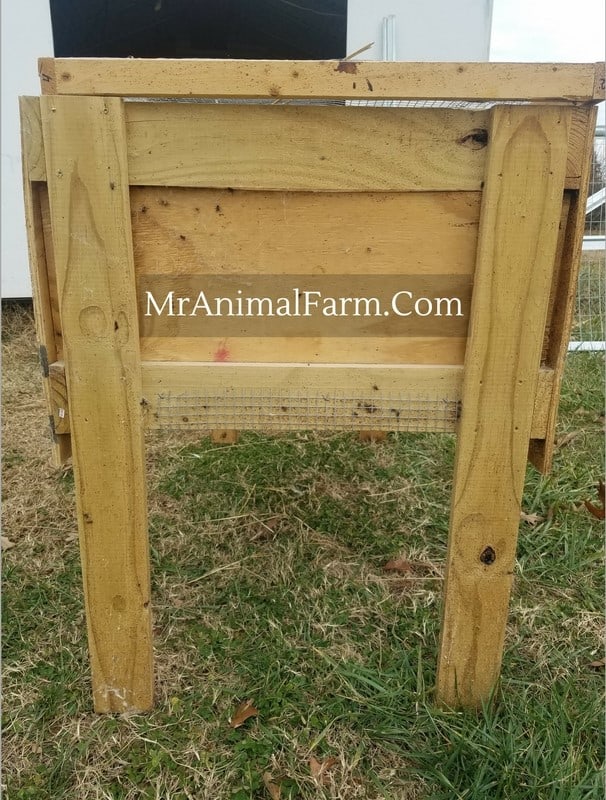
Connect a second 2' 1x4 (depth) to close off the top of the 'H' you just made. This should form an 'A'.
Repeat the above to steps to complete construction of the chicken brooder's sides.
Use a level to make sure each side is straight and does not wobble.
Take a 3' (width) piece and line it flush with the lower section of the side piece where the height and depth pieces connect. Screw them together.
Repeat this with the other side piece. This should again form an 'H'.
Connect a second 3' (width) piece to close off the top of the 'H' to form an 'A'.
You will now have ¾'s of a box complete. Flip the box over and use your remaining 3' (width) 1x4's to complete the frame.
Flip your finished frame upright and make sure it is level.
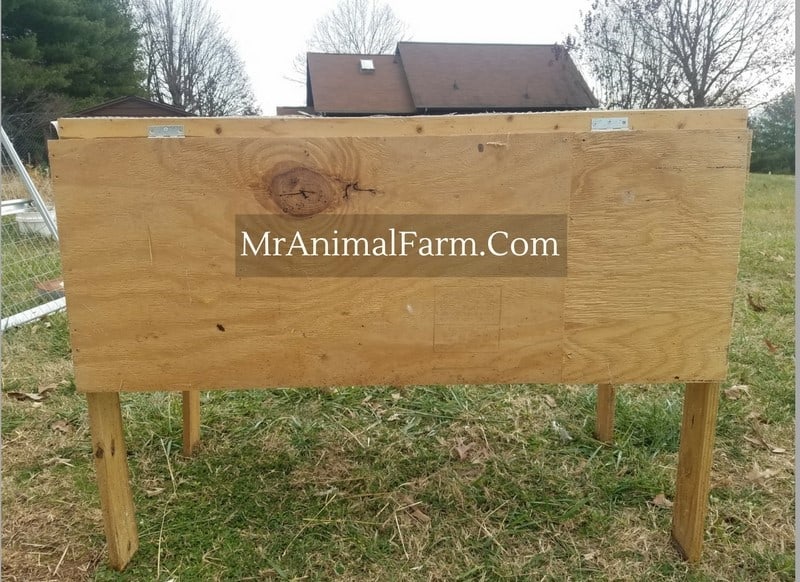
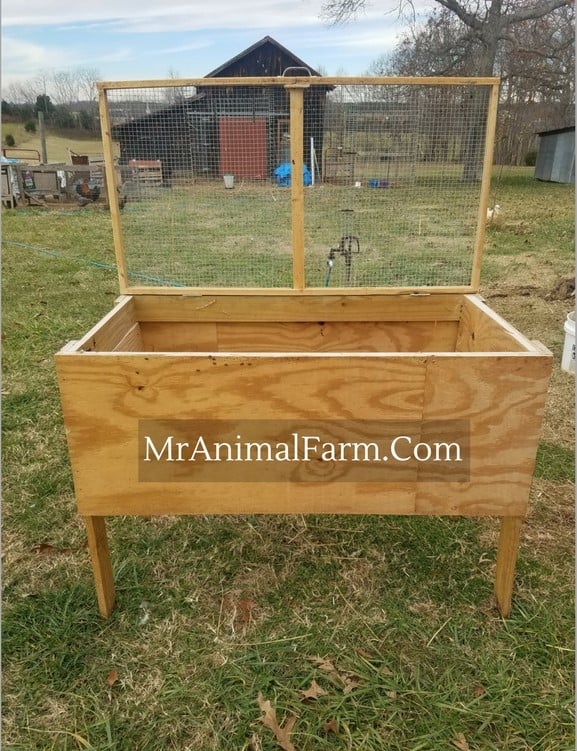
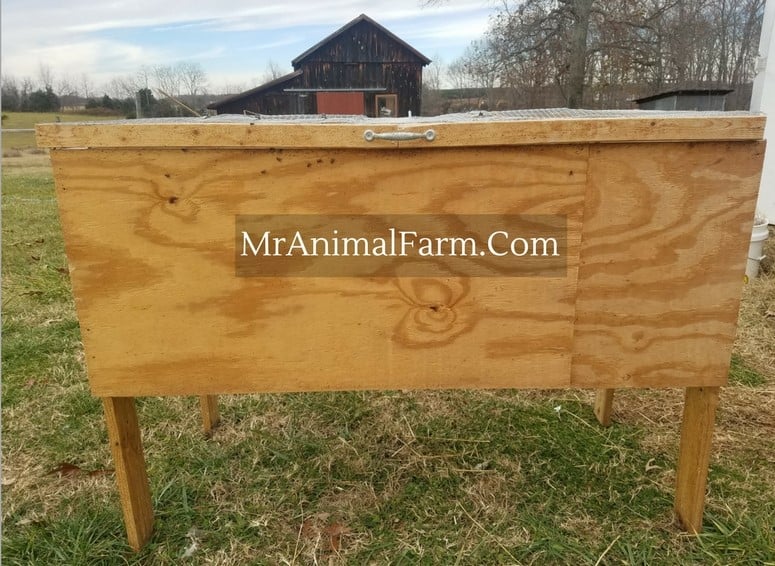
2.) Close the Sides and bottom
With your frame lying down, line your 2×3 sheets of plywood or 0.375" treated/untreated wood siding panel with the front opening of your frame. Screw this in place.
Flip the frame over and repeat for the back.
The side 2x2 sheets of plywood or 0.375" treated/untreated wood siding panel may fit a bit snugly. If they will not fit easily into place you may need a rubber mallet to tap them into the proper position. Once they are in place, screw them down.
Turn the frame upside down and stretch a 2x3 sheet of Galvanized Steel Hardware Cloth across the bottom. You may need to use the wire cutters on each corner to make the sheet fit around the leg of the frame. Secure the sheet with 1 ½" fencing staples.
Finally, with the brooder still upside down, measure 12" in from each side and attach a 2' 2" 1x2's support for bottom at each spot. You can use zip ties to secure the hardware cloth to the supports.
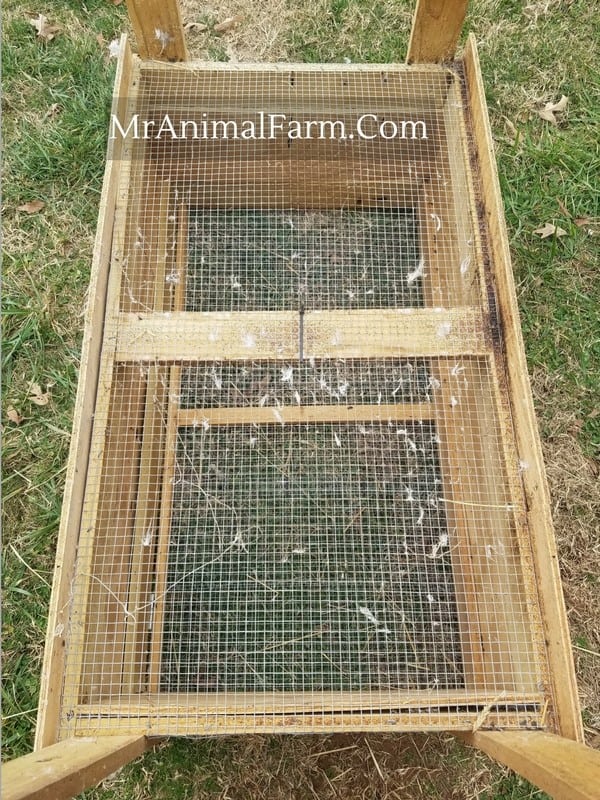
3.) Build and Attach the Lid
Line one end of a 2' 2" 1x2 with the end of one 3' 1×2 and screw them together; forming an 'L' shape.
Repeat the above step so that you have two 'L' shaped piece.
Connect the 'L' pieces together to form a box.
Take the final 2' 2" 1x2 and secure it in the center of the lid. It should look like a long rectangle containing two square sections or a sideways 8.
Stretch a 2x3 sheet of Galvanized Steel Hardware Cloth across the lid and secure it with more fencing staples.
Place the lid on top of your brooder and make sure everything lines up as it should.
Measure in 12" from each side of the lid and attach a cabinet hinge to each position.
Finally, attach the drawer handle to the front of the brooder lid.
FAQ
How big should a brooder box be?
When chicks are hatched to 4 weeks or so of age, they should have about .25 - .5 square feet per chick. Bantam chicks will take up less space. As chicks get to be 4 - 8 weeks they will need a little more room.
As a good key, make sure they all have room to move around freely without being right on top of one another. Although, especially when they are young, they will like to pile up to stay warm.
What can I use for a chick brooder?
You can really use any enclosed space as a chick brooder such as a plastic tote, feed trough, animal cage/crate or a homemade wooden box.
What does a brooder box need?
A brooder box needs four enclosed sides and a bottom - solid or a grate. It also needs a heat source, feeder and waterer.
How long do you keep chickens in a brooder?
You keep chicks in a brooder until they are around 8 weeks of age.
Can I use a kiddie pool as a chicken brooder?
Yes, you can use a kiddie pool as a chicken brooder. Just be sure to set pine shavings in the bottom so they are not straight on the slick plastic bottom. Also, they will likely be able to start jumping out pretty early on, so you might need a covering for the top or another, taller brooder for them after a few weeks.
Can a chicken brooder be outside?
Yes, a brooder box can be outside as long as it is in a draft free area - a shed, barn etc - that has a heat source.
Final thoughts
These chick brooder plans should not take too much time to complete and your new brooder will keep your fast growing chicks safe and secure!
Using the above dimensions for your chicken brooder plans should give you a brooder big enough for about 30 full sized young chicks. Of course, as they get older, they will need to be split into probably two brooders and then can be put into your coops.
Additionally, the sides of the poultry brooder are perfect for attaching a heat lamp. We clamp it to the side and then use metal twine to secure it so that if the clamp fails the heat lamp will be less likely to fall and be a fire hazard.
These chicken brooder plans have made it possible for us to hatch a lot of chicks to sell which helps to make money with chickens all while keeping the chicks happy and healthy with plenty of space.
Are you planning to use these exact chicken brooder plans or will you change the dimensions? We would love to see your completed chick brooders!
If you need more help with taking care of your chickens, check out The Organized Chicken Keeper for a complete system for managing their health through keeping their supplies stocked and coop clean.


Matt says
Not sure how old this post is, but I just finished the build for some ducklings.
I added a sheet of plywood (10 1/2 x 24) to the bottom, to help keep the food waste to a minimum. Used a stack of bricks under the wire on the other side to help support the waterer. I also doubled up the supports on the lid.
Solid build, thank you for design idea.
(Note a few more pictures along with the directions would have been nice. Also a picture showing heating options would have been appreciated. I ended up securing a heat lamp to the lid)
MrAnimal Farm says
Glad this worked well for you. Yes, we used to wire the heat lamp to the lid also.
Margaret says
I plan to have 100chicks how big should my brooder be?
MrAnimal Farm says
Hi Margaret, depending on the breed and how long they will be in the brooder. I would suggest at least 4 times the sq footage of this one. We used to have 4 - 6 of these sized brooders when we were hatching large numbers like that 🙂
Best,
Kristin
Lucy says
Can 25 chicks grow to 5 weeks in this brooder?
MrAnimal Farm says
Yes, they should be Ok to that age.
Alana Dotson says
I built this brooder for our 25 4H chicks. They are almost 3 weeks old. It is big enough for them but it is not big enough To keep the mess down. I use Flock Fresh and they are constantly scratching it into the waterers and feeder. I also have to water them about 3 times a day because the Flock Fresh absorbs the water. If I had it to do over again, I would have built a brooder box at least twice this size for 25 chicks. Probably three times this size if you want to include things such as a swing, hanging treats, etc. I will be keeping this box for future use if we ever decided to add no more than 5 chicks to our flock.
MrAnimal Farm says
Hi Alana,
I probably should have added to this post a few things:
1) We let our stay on the wire bottom which helps prevent things from getting into the water.
2) We raised mostly silkies which are a lot smaller than other breeds. We have raised Easter Eggers in these as well and did up to 25 per brooder - we would let them typically stay 4 - 5 weeks and were usually outgrowing it around then.
Kris Kramer says
Maybe I missed it, but how are you providing heat? Our outdoor challenge is providing heat without it all escaping through the roof.
MrAnimal Farm says
We keep these brooders in a metal shed that has electric in it. You can use heat lamps (make sure they are VERY secure with the fire hazard) or heat plates (which are a bit safer).