Whether you have your own flock and want to add new chicks or you are just getting started with chickens and want to hatch your own, learning how to incubate eggs can be a little intimidating.
However, once you get started hatching, you might get obsessed with using an incubator to hatch chicks much like we have. It is so exciting!
There are five main steps in learning how to incubate eggs. The whole process takes 21 days. First, you have to set up your incubator and supplies. Next, you have to gather your hatching eggs. Third, you need to load your incubator. Fourth, maintain temperature and humidity while turning eggs. And, finally, candle and lockdown where you assess which eggs developed and raise humidity for hatch time.
How to Incubate Eggs
There are several stages to setting up to hatch your own chicks. It doesn't really take all that long, just about 21 days in total once you get it set up. And although you will need several supplies and to make sure your incubation time follows some rules, everything can be broken down pretty easily into simple steps.
Incubation Supplies
Fertile Hatching Eggs
You will need to know how to tell a chicken egg is fertilized if you want to hatch chicks. You can either use your own, or purchase them.
If you want to use your own hatching eggs, although roosters don't lay eggs, you do need one to fertilize eggs. The chicken mating process isn't too terribly complicated and they should do the job naturally on their own.
You will want to ensure your rooster is mature (otherwise he won't mate or won't be fertile). And you want to make sure that you have the right amount of roosters to hens - too many and they can injury your hens and not enough and you won't get as many fertile eggs.
When you collect your own hatching eggs, be sure they are normal sized - not too big or too small. Also be sure they are clean - not too much poop or mud or other debris.
Incubator
Of course, unless you are using a hatching chickens with a broody hen, you need an actual incubator to hatch eggs. There are multiple different types of incubators - still air, circulated air, automatic, cabinet.
The type of incubator that you get will be dependent on your needs, goals, space and budget. If you haven't decided what to use yet, here are some of the best incubators on the market.
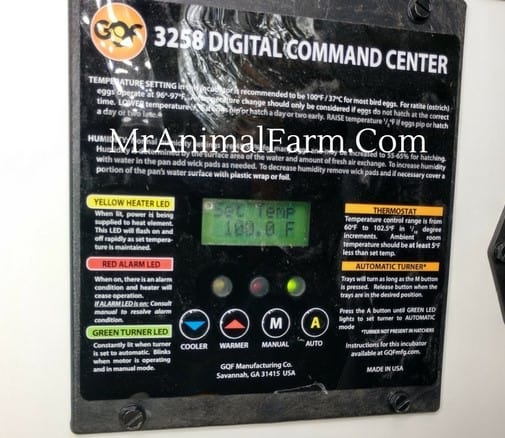
A hygrometer - which is a tool that measures humidity - is an essential piece of equipment to have when incubating eggs. Humidity plays a large roll in having a successful hatch, and so you will need an accurate way to monitor it.
We tried multiple different hygrometers when we first started hatching. And although we now use this cabinet incubator which is fully automatic and has a built in hygrometer, when we have smaller hatches and don't use our cabinet, we still need a reliable hygrometer.
This hygrometer/thermometer combination is THE BEST one we have found. It is accurate, but also it fits in all the incubators we have tried it in. You see, after you add your eggs in, there's not always a ton of room between the top of the incubator and the top of your eggs. So, you need to be sure to use a hygrometer that will actually fit.
Thermometer
Most incubators will have a built in thermometer, especially after time, they are not always easy to read or accurate. So, unless you get a fully automatic, more expensive incubator, it's recommended to get an additional thermometer.
As mentioned above, you can get the hygrometer/thermometer combination that we recommend and you will be covered.
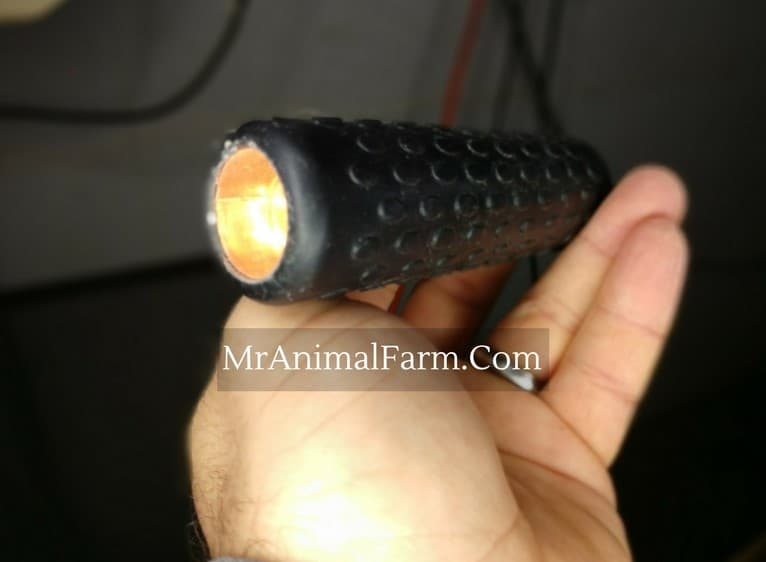
An egg candler is basically a device that is like a flashlight, but where the light is high powered and comes out of a small area.
You use the candler right before lockdown (more on that in a moment below) to assess whether or not your eggs are developing and viable.
This egg candler is our favorite, we have used several. It is really well made, lasts for a long time and it is very easy to use.
Water
This is a pretty basic supply, just regular water will be needed. You will add it to your incubator and keep the reservoir topped off during incubation. The added water helps ensure that humidity can get into the right range.
You'll need egg trays both to store your eggs before you load them into the incubator and also to hold the eggs in the incubator (depending on what incubator you choose). Some incubators will have built in trays or other racks to hold the eggs.
Of course, if you don't need trays for use in your incubator, you can simply use egg cartons to store the eggs before hatching.
Chicken Brooder - for when chicks hatch
In addition to the supplies you need for the actual incubation process, you will need the supplies for Raising baby chicks so that you are prepared to take care of them when they hatch.
If you need more help with taking care of your chickens, check out The Organized Chicken Keeper for a complete system for managing their health through keeping their supplies stocked and coop clean.
The Egg Incubation Process:
Once you know you have fertile eggs (or have purchased some hatching eggs) and you have gathered all of the things you need to hatch the eggs you can get started with learning how to incubate your eggs.
(Please note: for specific humidity and temperatures you should follow the guide given for your incubator as these may vary based on type and model. The estimates given here are for our incubators the Brinsea Eco 20. Though temperature and humidity will typically a similar/the same range for most incubators. Just make sure that you follow any deviations that your specific model has.)
Gathering/Resting Eggs
If you buy hatching eggs and ship them, we recommend letting the eggs rest (large end up) for several hours so that the air cell can stabilize. The air cell must be in tact (it can get a bit scrambled with all the jostling during shipping) in order for a viable chick to develop and hatch.
The air cell will expand during incubation due to the humidity in the incubator. This air cell is where the chick will get it's oxygen from. It is also where the chick will break through the membranes and actual shell to pip the egg when it is time to hatch.
If you have saved your own eggs, they should also be stored large end up and turned at least twice each day until they are in the incubator.
For easy turning, we keep ours in a clean egg carton in a climate controlled room (where the temp stays over 50, but under 70) and we just put a paper towel roll under one end. We switch sides twice a day
Loading the Incubator
So, once your eggs are gathered and/or rested, you can get them in the incubator. We let ours run for at least 24 hours prior to adding eggs so that the humidity and temperature are stable.
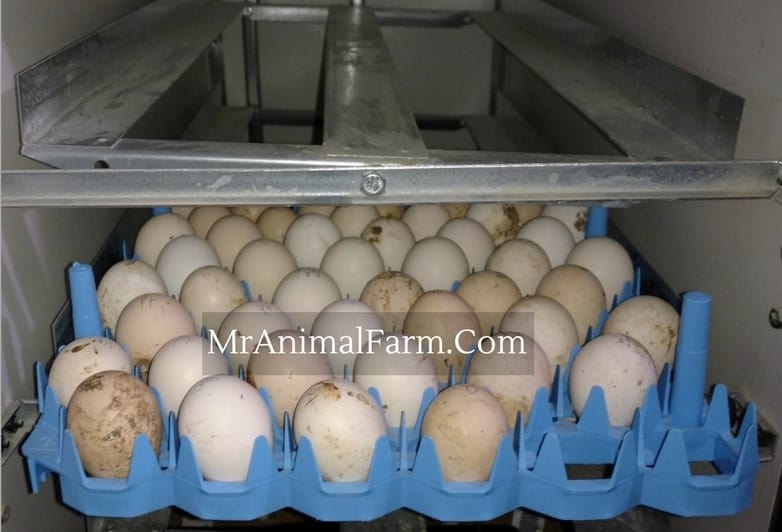
For our incubator, we run the humidity from 40 - 50 % from day 1 - 18 and the temperature around 99.6. We use this hygrometer to gauge both temperature and humidity.
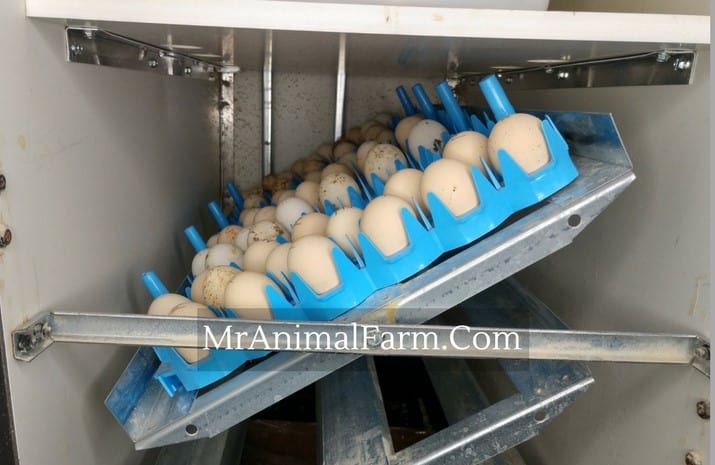
Turning the Eggs
You should turn the eggs a bare minimum of twice a day. We recommend doing it an odd number of times, so 3 or 5 so that they don't lay on one side all night every night.
If you don't turn your eggs, the membranes can get stuck to the side of the shell and make it difficult to impossible for the chick to hatch when the time comes.
You won't have to worry about the turning if you have an automatic incubator.
Candling the Eggs
Candle the eggs somewhere from day 7 - 10 and then again at day 18 right before you put them on lockdown (more on lockdown in step 5). You can buy a candler or use a small flashlight. You will want to be in a dark room and you can check each egg to see how/if it is developing.
What you are looking for is whether or not there is a viable, fully formed chick in the egg.
Sometimes you will find eggs that are totally clear - did not develop at all, possibly due to not being fertile. Other times, you will find eggs with a blood ring - this means the chick started developing but died for one reason or another. You can also find eggs that are only partially developed and those won't be far enough along to hatch - they have usually stopped developing also.
Check out some example pictures of Egg Candling here.
For eggs that are not developing, have blood rings or other early death you will want to remove them so that they don't go bad and explode.
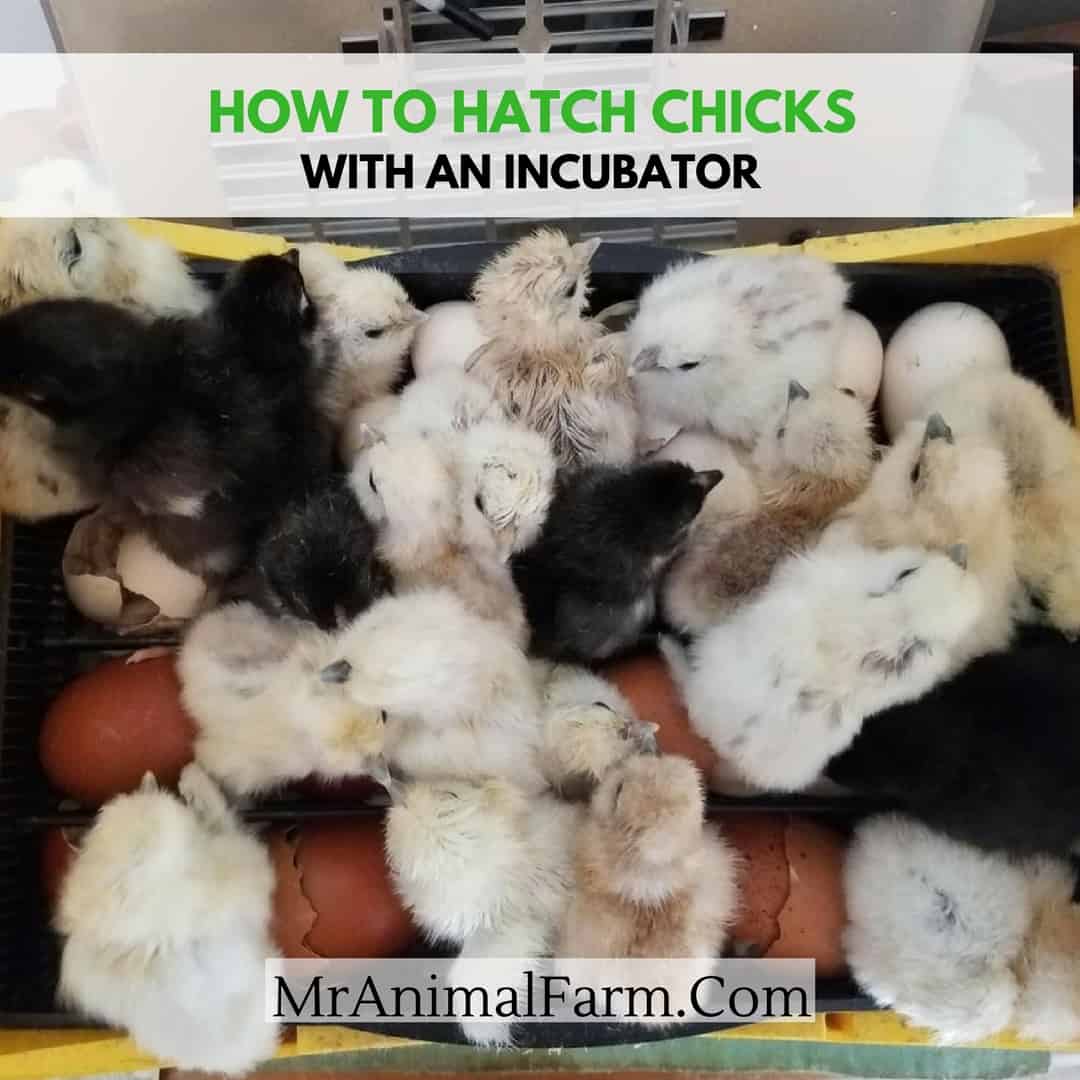
Lockdown and Hatching
On day 18, after candling, you will put your eggs on lockdown. To do this, you will stop turning them and crank the humidity up. For our incubator, we turn it up to the 60% range.
You should start to see chicks hatching around day 21. However, keep in mind that if your temperatures ran a little high they may hatch earlier. If they ran a little low it may take a day or two longer.
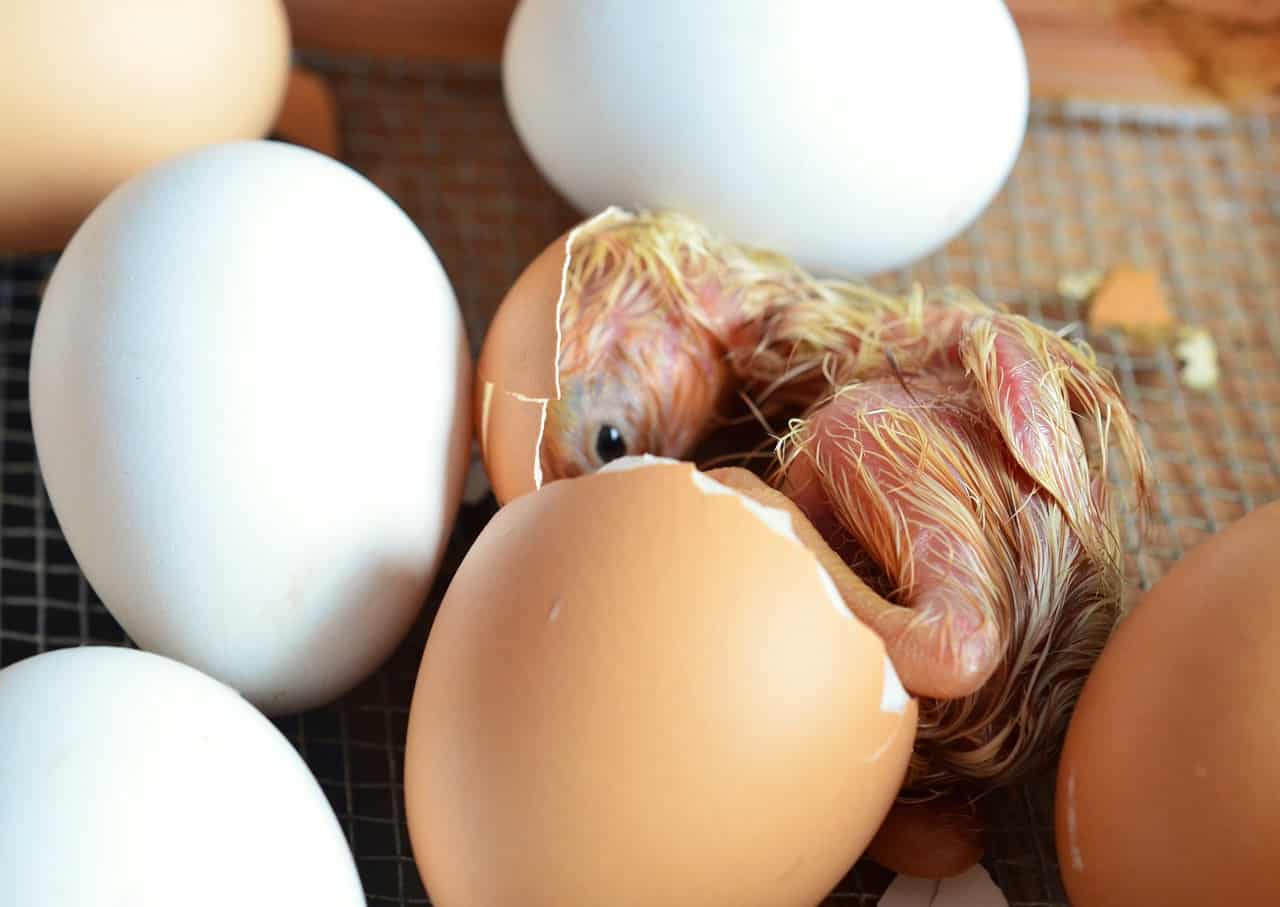
You may hear some peeping from inside the eggs before you see any actual hatching activity. Then, you will start to see some eggs get pips in them. A pip is basically a small hold that the chick has pecked into the side of the egg as it starts to hatch.
Some chicks will go straight to the next hatching step after pipping, others will rest and it may take several hours or more to move to the next steps.
After pipping, the chicks will start to zip around the shell. They start at the hole they have made and start pecking away in a line around the top of the shell (it looks like pulling back a zipper to pop the top off of the shell).
Once they have zipped around the shell far enough, they will be able to pop the top off and fully hatch.
It is important to note that as in the pipping stage, some chicks will hatch quickly through the rest of the process while others will take long breaks in between. As long as they are still moving and don't seem completely stall they should be ok.

Also, during lockdown (as hard as it may be), do NOT remove the chicks as they hatch. You want to leave the chicks in and the incubator closed until all of the eggs have hatched. Opening the incubator can cause the humidity to plummet, shrink wrapping the unhatched chicks into their eggs. In these cases you may need to help the chick hatch.
The chicks that hatch first will be fine without food and water for up to 48 hours. They are still absorbing the nutrients from the yolk.
Once your hatch is complete, you can remove the chicks and add them to their brooder. If you will be vaccinating your chicks you should usually do so right away.
Here is how to set an incubator:
Now that you know how to incubate chicken eggs, are you planning to try to hatch your own chicks? Let us know if you have any questions in the comments section!
If you need more help with taking care of your chickens, check out The Organized Chicken Keeper for a complete system for managing their health through keeping their supplies stocked and coop clean.


Younes Shimou says
hello hello Mr farmer
i just had my first experience with incubating chicken eggs; before i started this journey i bought an incubator which can contain a maximum of 2000 eggs and also i bought 1000eggs as a fist test
i fixed the temperture at 37;7 degrees celsius and the humidity at 50% in the first 18days and i increased the humidity up to 70%. i had to rotate manually the position of eggs every 2hours.
unfortunatly the results was frustrating; i had just 15% of the eggs hitched.
is there any advice or suggesting to increase the productivity?
greetings from your moroccan friend 🙂
MrAnimal Farm says
You also will need to make sure that your eggs are fertilized and good. With only a 15% hatch rate, unless your thermometer and hygrometer are off showing wrong temp and humidity - I would think perhaps the eggs you had were not good.